Jonsbo TR03 PC Case – First Look

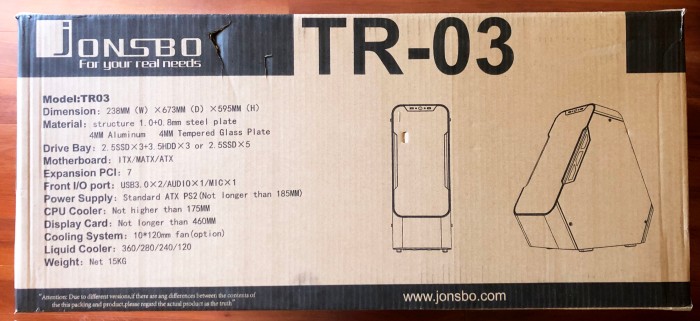
The TR03 is a new case from the Chinese manufacturer Jonsbo. This triangular design is sure to be polarising, but after seeing 100 near-identical builds based on popular cases like the Lian-Li PC-O11D, I decided I wanted something different.

Official photo from Jonsbo product page.
https://www.jonsbo.com/en/products/tr03gsilver.html

1. Overview

  • Price: AU$389 (~US$300)
  • Dimensions: 238mm(W) x 673mm (L) x 595mm (H)
  • Material: Steel frame, with aluminium and tempered glass panels
  • Size: ATX
  • Fans: Up to 10* 120mm fans

2. First Impressions

I pre-ordered this case from Australian retailer PLE back in November when I ordered my new Ryzen 5900X (link). (Note: I paid full price for this case, and I do not receive any consideration from Jonsbo or PLE for the review.) This is not a cheap case at AU$389, which is around US$300. In Australia, this is close in price to a case like the Lian-Li PC-011D XL.

Before you even open the box, the first thing you notice is the size – the box is huge. (Sorry, I should have included a banana for scale.)

Box of the TR03
© YendorMakes 2021

Opening it up, you reveal the case, which is similarly massive:

Side-View of the TR03
© YendorMakes 2021

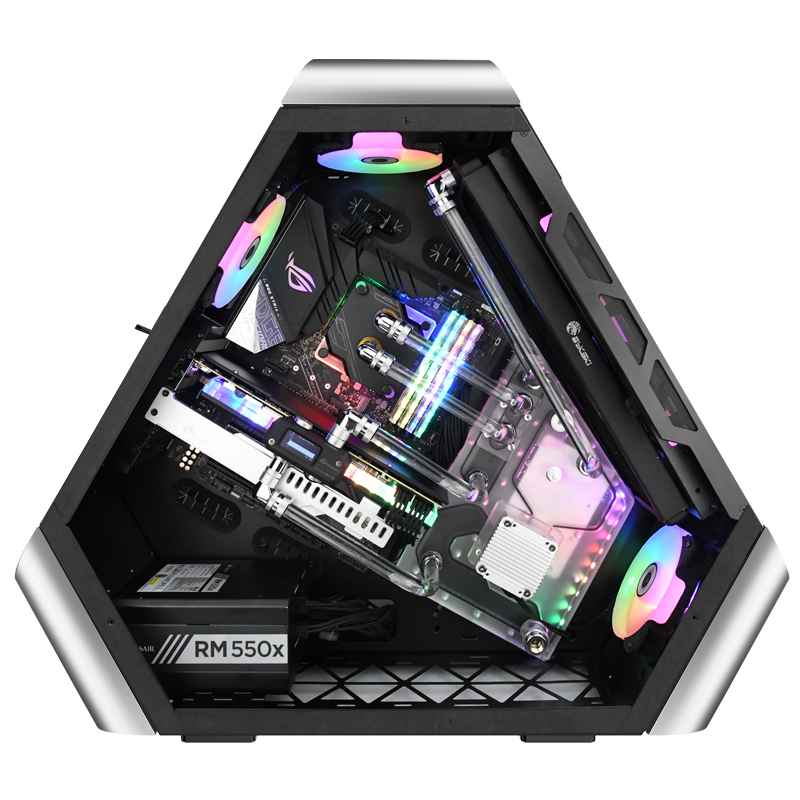
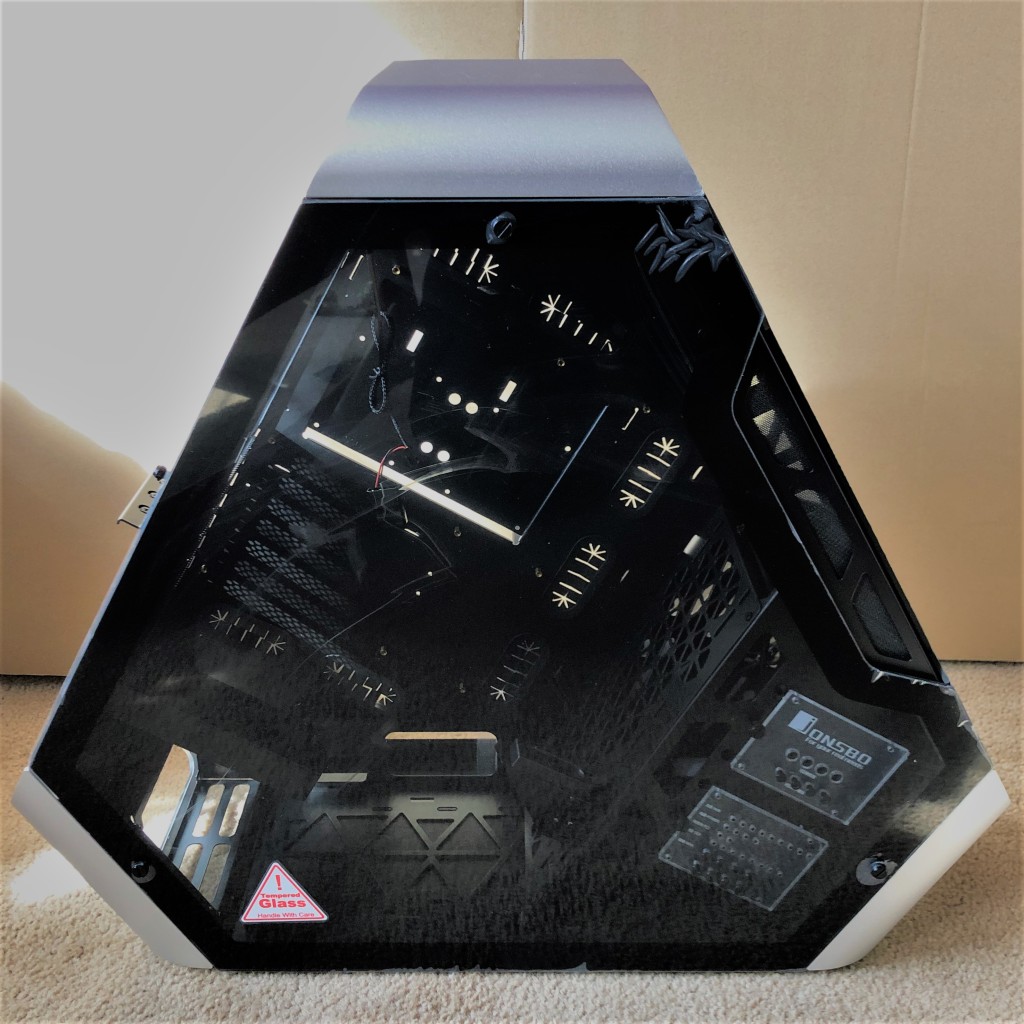
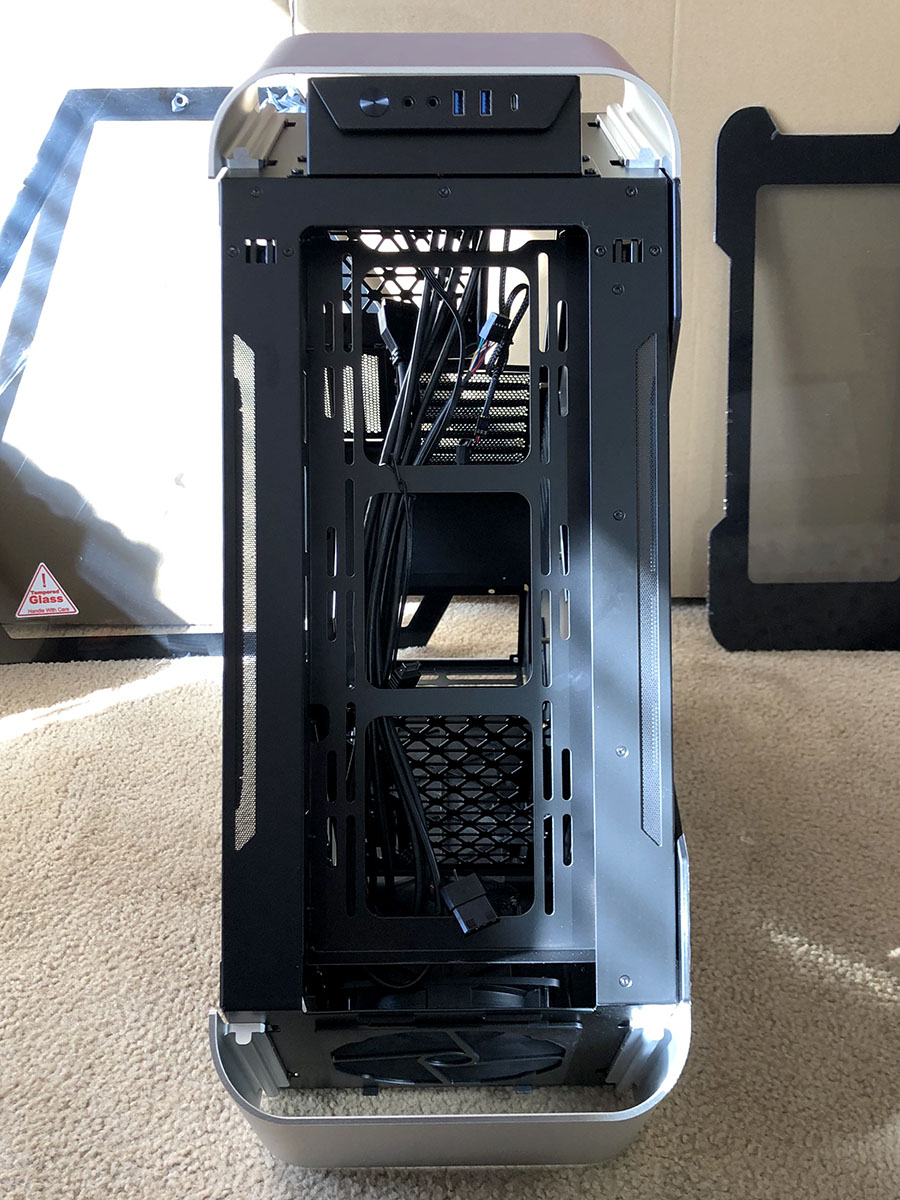
The case features large tempered glass side panels, with black edges outlining the window. Popping off the panel, we get a clearer look at the insides:

Side-View of the TR03
© YendorMakes 2021

From the factory, there are two 120mm fans installed – one intake (lower right) and one exhaust (top). There are dedicated space to install another exhaust fan (upper left) and three more intake fans (the entire right side). Depending on your setup, you could potentially fit another two intake fans at the bottom.

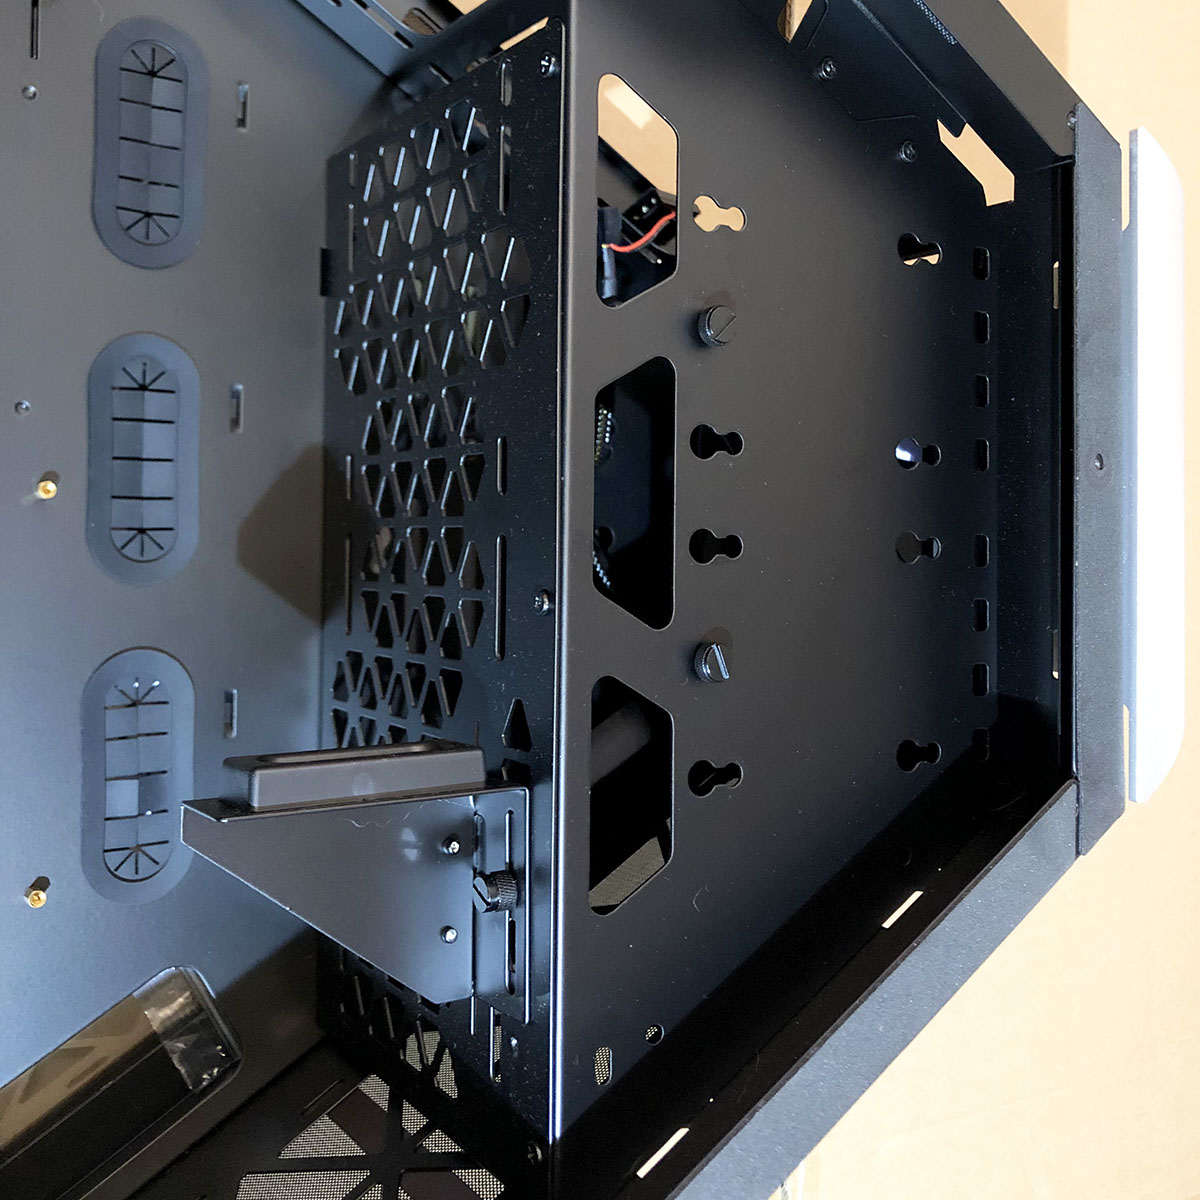
The case has significant features for cable/hardware management:

  • 7x Cable Entries, to allow cables to be routed via the rear of the case;
  • A removable plate behind the CPU, that can hold 2x SSD
  • An additional rear plate for mounting a third SSD
  • Rear bracket and slots for vertical PCI-E card mounting
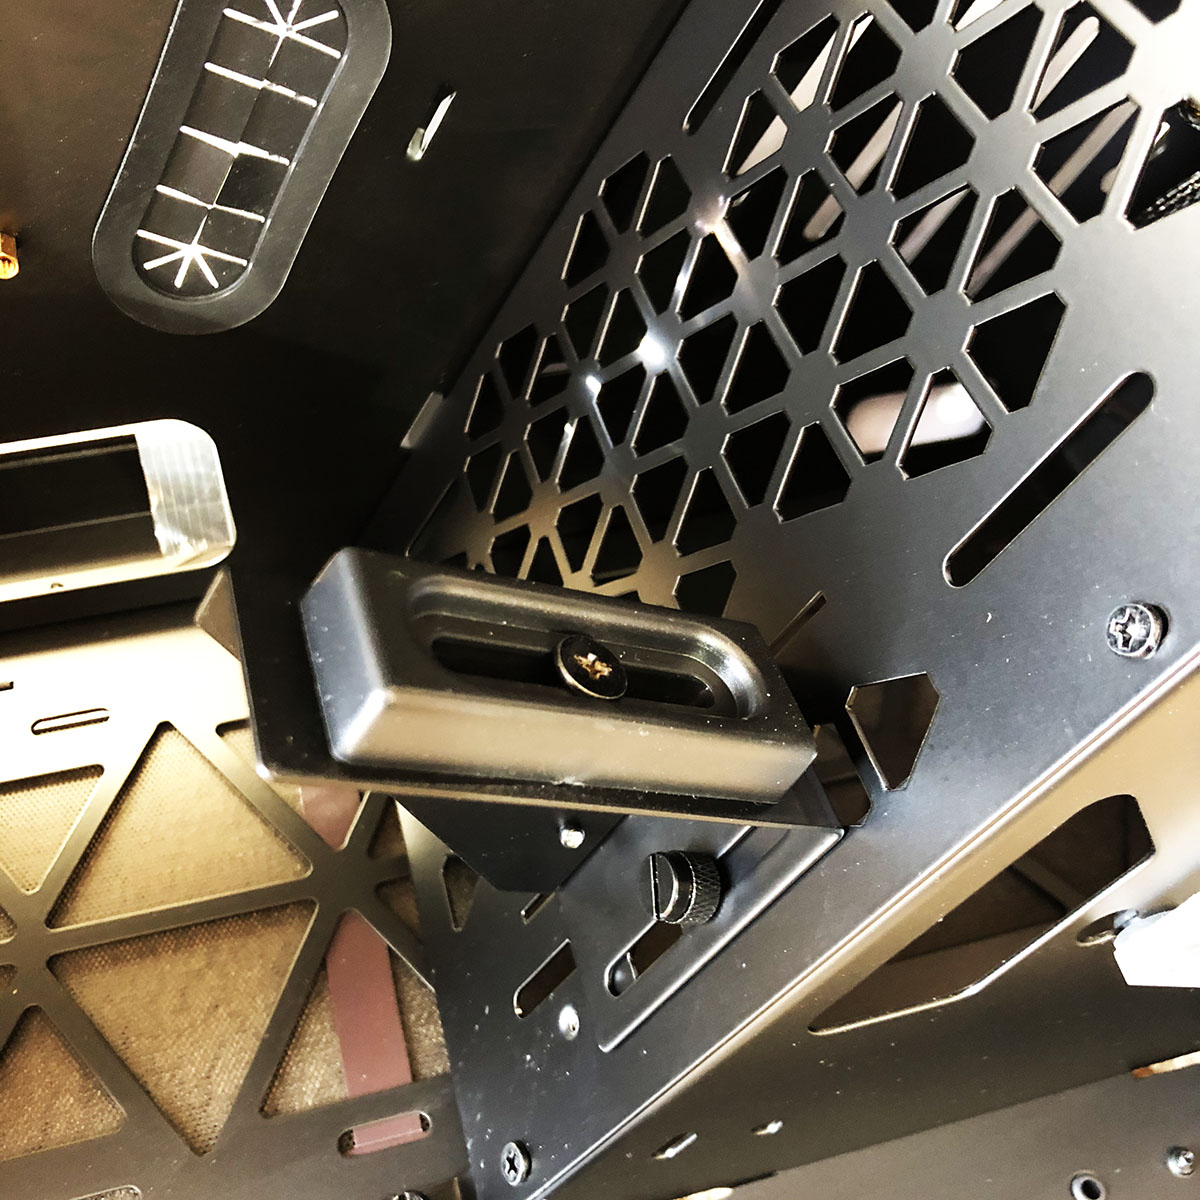
  • The case has a metal bracket in the bottom right. It has space for two fans, a sliding bracket for supporting a long GPU, space to hold 2x HDDs/SSDs and two trays of screws for the install:
View of the Lower-Right Cage of the TR03
© YendorMakes 2021

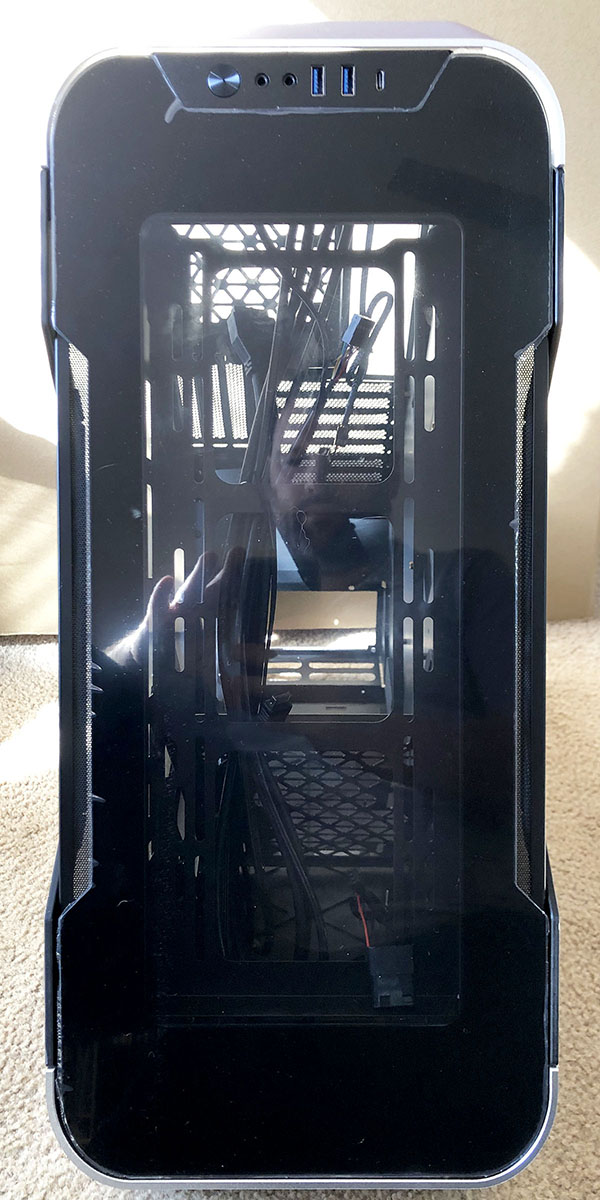
The front of the case has a tempered glass cover, with a long slot covered in mesh for air entry on each side. Behind the glass is space to mount 3x 120mm fans or 2x 140mm fans. At the bottom there is 1x 120mm fan (pre-installed) which has a mesh over it and the metal corner of the case about 3cm in front of it:

View of the Front of the TR03
© YendorMakes 2021

The top of the case features a Power button, Audio, USB-A and 1x USB-C:
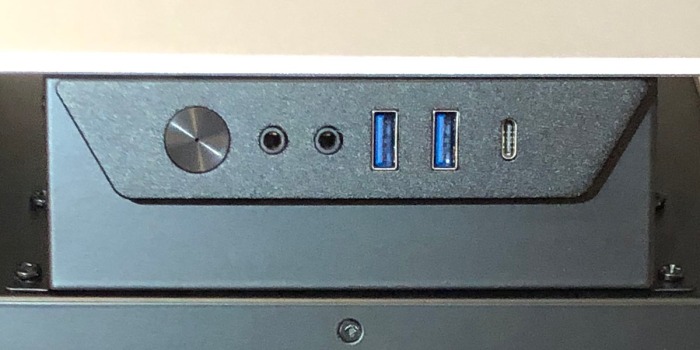
View of the Top-Front of the TR03
© YendorMakes 2021

The rear of the case features what you would expect – a hole for the I/O backplate, space for 1x 120mm fan and 7x expansion slots. There are also 3x vertical expansion slots, presumably for people who sold a kidney for an RTX3090 and want to show if off! At the top there is a pre-installed 120mm exhaust fan protected by the top corner of the case (much like the front intake fan). At the bottom of the case is the space for the PSU.
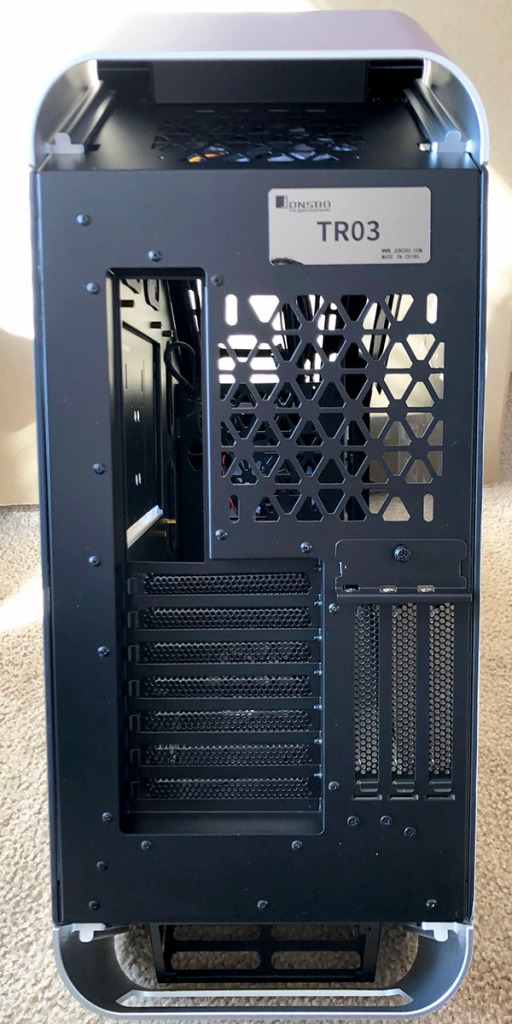
View of the Rear of the TR03
© YendorMakes 2021

The rear of the case has 3x mounting points for SSDs. There are a solid number of points for cables to be routed from the front of the case to the rear, and a decent amount of space for cabling, lighting controllers, etc…:

View of the Back of the TR03
© YendorMakes 2021

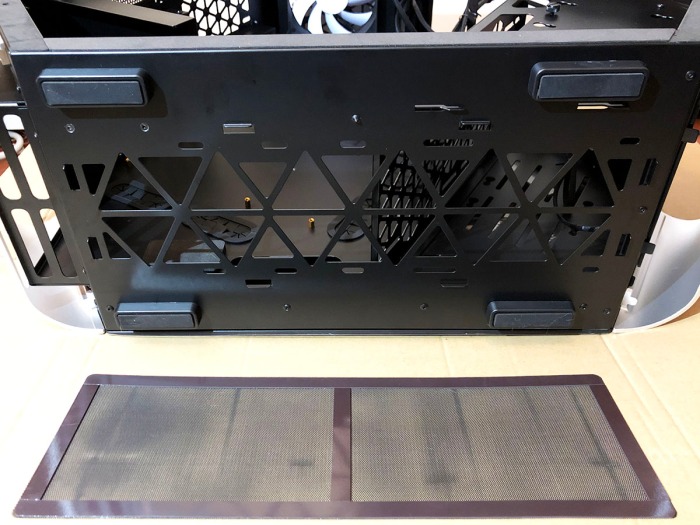
Finally, the bottom of the case features four feet that will keep the case about 1cm up from the floor. If you’re sitting it on tile/wood you’ll be fine, but if you have thick carpet it may block the airflow at the bottom. This is where most PSUs will be drawing their air from, and there could be room to mount 2x 120mm fans if the PSU isn’t too long. The bottom also features a magnetic dust cover to keep all the intakes clean (let’s hope it works for pet hair):

So yeah, those are my first impressions of this case. As I build my new system I’ll post up more details, including what radiators we can squeeze in and how well this weird shape works. If you have any questions, I’ve enabled comments below, so leave me a comment if you have any particular questions you want answered.

Stay tuned!

Adding HomeLink to a regular Garage Door, using the RemotePro receiver

So one of the cool features of the Tesla Model 3 is HomeLink (wikipedia). HomeLink gives you the ability to Open and Close your roller door directly from the screen in the Model 3. Homelink can also activate based on location, so you can have your car automatically signal to open the roller door as soon as you approach the end of your driveway.

Unfortunately, HomeLink doesn’t natively work with many Garage doors in Australia. However, a company in Queensland sell a small device that you can fit to your Garage Door to give it HomeLink capability: Tesla HomeLink Compatible Garage/Gate Receiver from RemotePro.

  • V (+12V to +24V supply)
  • Ground (0V)
  • Relay 1
  • Relay 1
  • Relay 2
  • Relay 2
RemotePro Homelink Receiver (Outside)RemotePro Homelink Receiver (Inside)
Images from: https://www.remotepro.com.au/products/tesla-homelink-compatible-garage-gate-receiver

The RemotePro interfaces to the existing Garage Door with up to six wires:

To get it working, you need to supply power between 12V and 24V on the V/GND terminals, and then utilise one of the relay contact to trigger the garage door controller.

My garage door is a “Automatic Technology Securalift GDO-9V2”, pictured below:

GDO-9V2

I found a manual for the roller door here: http://www.ata-aust.com.au/AtaAust/media/Manuals/GDO-9v2-Enduro-GDO-9v3-Manual-v1-01.pdf (However, as I found out, you shouldn’t blindly trust the manual.)

Opening up the rear of the controller exposes the control circuitry:

GDO-9V2 Control Board

The bit I was really interested in was the terminal block in the top left:

GDO-9V2 Terminal Block J2

The pins didn’t exactly match the pins described in the manual, so it took a little experimenting to confirm what each one did:

  1. PWR: Supply Voltage
  2. PE: PhotoElectric beam (to stop the door closing if obstructed)
  3. PE-: PhotoElectric beam (to stop the door closing if obstructed)
  4. GND: 0V
  5. OSC: Open/Stop/Close (this pin will trigger the door to Open/Stop/Close when momentarily connected to ground.
  6. AUX: Auxiliary out (for things like external lights)

The first task was to confirm the supply voltage for the RemotePro. Putting my multimeter across the PWR and GND shows it’s a bit too high for the RemotePro, at 32V:

GDO-9V2 Voltage

This 32V is a problem – the RemotePro only has an input range of 12V-24V.

So the next step probably won’t be required for everyone, but if you have 32V, here’s a simple way to turn it into 24V. I grabbed a simple 3-pin regulator (LM7824) and a couple of capacitors, a diode, and wired them onto a tiny PCB.

3-pin Voltage Regulator (zoomed)3-pin Voltage Regulator in-line

Connecting the wires as follows:

ColourFromTo
BlueController PWRVoltage regulator +ve input
White/BlueController GNDVoltage regulator -ve input
BrownController OSCOrange/White & Green/White
From the Controller to the mini-PCB
ColourFromTo
OrangeVoltage regulator +ve outputRemotePro V (+24V)
White/OrangeVoltage regulator -ve outputRemotePro Ground (0V)
GreenMini-PCB (OSC for Relay)RemotePro Relay 1
White/GreenMini-PCB (OSC for Relay)RemotePro Relay 1
From the mini-PCB to the RemotePro

And the results speak for themselves:

Output of the Voltage Regulator

So, now I had a cable with two pins with the voltage, and two pins for the relay. All I needed to do was connect these 4 pins into the RemotePro:

RemotePro wired-up

With all the wires connected, it was time to configure the Car. Just use the remote from RemotePro, and follow the on-screen prompts.

With everything working, it was time to close it up and do a final test from out on the street:

RemotePro installed on the ceiling

And that’s it. I’ve now configured the HomeLink in the car to automatically open the RollerDoor when I get home (set to 21m distance), so the door starts rolling up as I turn into the driveway. Very futuristic!

Anyway, I would definitely recommend this to anyone with HomeLink in their Tesla. I’m not sure if I would pay the $450 install cost to put HomeLink into the carif I didn’t get it for free, but if you have HomeLink then the $60 for the RemotePro is definitely worth it!

Power Tailgate in RHD Model 3 SR+

So I’ve just installed the Hansshow Power Tailgate (v3) in my RHD Tesla Model 3 SR+. This kit has multiple great installation videos online – however these don’t quite match the new v3 kit from Hansshow, and there are differences with the RHD that the instructions from USA/China don’t cover.

This is an early preview of the page – more photos and videos still to be added.

INTRO

The Product: Model 3 power Trunk and Frunk from Hansshow(currently US$499)

I originally saw the kits on Reddit/Facebook and loved the idea of making the Model 3 a bit more premium, especially with the way the boot lid takes a decent push to lock closed. Before purchasing the kit, I looked at the instructions and watched a few YouTube Vids. The instructions really aren’t great, but this video was great:

Install Video: Tesla Model 3 – Hansshow Power Trunk Liftgate Installation and Review!!! from Because Tesla

That video, and every other video I could find, were based on the original v1 kit. It appears that the kit changed at some point, resulting in some of the wiring connections differing. There are now v3 instructions from the manufacturer, but they still leave a lot to be desired.

Instructions: Tesla Model 3 electric tailgate installation instructions – Version 3.0

I’m not going to re-explain everything in the Video from Because Tesla, but I will outline everywhere that the new kit and/or the RHD model differ from the video.

Difference 1. Cable through the tube

The cables that need to run to the tailgate in the v3 kit are different to the v1 kit. The only wire you need to run into the tailgate now is the three-core cable to the tailgate button. To get this though the tube, you de-pin the connector, pull it through, then re-pin it:

This is the tailgate switch connector.
Carefully remove the yellow part.
Remove the pins by angling them up, then out.
The pins will now be free of the connector body.
Attach them to the pull wire with electrical tape.
Pull the cable through the tube.
Put the pins back into the connector.
Reinsert the yellow tab to lock the pins in place.

In the v1 kit, multiple wires are run into the trunk. In the v3 kit, there is a new “tailgate signal wire”, which plugs into a connector on top of the rear deck.

Difference 2. Tailgate Signal Wire

So this is the new wire. I’m guessing Hansshow switched to the new design because it doesn’t require tapping into wires, so it’s more removable later on. But here’s the thing: you need to disassemble half of the rear of the car to get to the connector in question (see exhibit 1 below):

Without a fish-eye lens, it’s hard to show how much of the car needs to be disassembled to get to the tailgate signal connector.

The manufacturer instructions kinda show what you need to do, but it’s really unclear, and definitely doesn’t convey how much work is involved. Those instructions also seem to show some steps that aren’t relevant to the v3 kit. Maybe I got something wrong – but there are no wires left, and the kit works. Or maybe there’s an easier way – if you know of it, please message me. (This was at least 4 hours work, but now I know what to do I could probably do it in 60-90 minutes.)

1. Make sure you have enough room to open the tailgate and both rear doors.
2. Lay down the rear seats.
3. Remove the bolsters beside the rear seats:
4. Remove the side rail trim between the tops of the B pillar and C pillar:
5. Remove the C-pillar upper trim:
6. Remove the C-pillar rear trim:
7. Remove the parcel shelf:

(Images above courtesy of the Tesla Model 3 Service Manual, copyright Tesla.)
8. Now that you have the parcel shelf out, identify the stock connector on the right hand side, and run the new connector up through the small hole from the boot/trunk:
9. Disconnect the stock connector, and insert the new connector:
10. Use a zip-tie to tie down the New Connector, so it doesn’t obstruct the parcel shelf. (Sorry, no photo of this bit.)
11. Reverse all the steps from 7 back to 2, to reassemble the vehicle.

Difference 3. Power

The instructions from Hansshow tell you to run power to the front right side. Unfortunately the instructions have a really low-res photo, so it’s completely unclear where that connections is meant to go to.

There have been a few sources identified by Ingineerix on YouTube/Reddit (LINK). I checked to see if the VCLEFT connector was usable, but it appears to already be populated in my RHD Model 3. (The online conjecture is that this is for a future trailer connector.)

EDIT: Since installing, I found out there’s meant to be a bolt where you can grab 12V from. See the second photo from the LINK here. I think this is what Hansshow were referring to – but the 160pixel photo isn’t really clear.

Ultimately, I was left with two options:

  1. The +12V Battery at the front; or
  2. The DC-DC converter on the HV battery penthouse.

To avoid the issue with the “12V Battery Needs Service” error, I connected the B+ wire to the output of the DC/DC converter, and I connected the GND wire to a screw in the boot/trunk.

Photos coming soon…

CONCLUSIONS

So after reassembling everything, I’m happy with the results. The Kit works beautifully with any of the controls from the vehicle, although occasionally I need to unlock/relock the vehicle to get it working with the App.

Centre Console Wraps – Tesla Model 3 Australia

The general consensus on the stock centre console seems to be that while it looks good, it’s also a fingerprint magnet. The solution? A wrap. So, what are our options:

You could always just buy a roll of 3M vinyl and do it yourself, but that’s probably more expensive, and definitely more difficult, than using a wrap custom-cut to match the surfaces inside the Model 3. There aren’t many objective measures to consider when picking a wrap for your centre console – it’s mostly down to your personal feeling on the aesthetics. So, what do the different manufacturers have to offer?

Jump to Conclusions

1. Abstract Ocean

Abstract Ocean make a number of accessories for Teslas – including custom cut Centre Console Wraps. The wraps are made from premium 3M 1080 Vinyl.
They offer all the standard colours, including:
– Black & White Carbon Fibre
– Brushed Metallic Black/Titanium/Steel
– Matte/Matrix/Shadow Black
– Satin Black/White
In addition to these, they also offer (for US$10/AU$14) custom wraps in over 100 colours.
The price for regular colours is AU$57 (US$40), plus + AU$20 shipping to Australia – so AU$77 all up.
(And AU$91 for custom colours.)

2. EVwraps

So EVWraps specialise in – you guessed it – EV Wraps. Their colour selection is almost identical to the core colours offered by AbstractOcean above, probably due to the fact that they use the same 3M 1080 material.
The wraps are AU$43 (US$30), and postage to Australia AU$20, for a total of AU$63 delivered.

3. RPM Tesla

In the 3M 1080 Wrap, RPM Tesla offer the same colours as AO and EVW above. But they do have a cool point of difference – they offer embossing options – so you can have a Tesla “T” embossed in the lower part, and a “3” or “☰” on the upper part.

RPMTesla also offer wood that matches with the wood on the dash. If you have the black interior and like the wood look, you would have to consider this.
Prices are AU$71 (US$49.99) on the regular colours and $124 (US$87.00) on the wood. Postage is AU$35 (US$25), for total prices of $107 for colours and AU$160 for wood.

4. TapTes

TapTes is a new player in Tesla accessories. Operating out of Hong Kong, they offer free shipping to Australia, which can make a big difference compared to buying from the US. There were some complaints regarding quality of some items early on, but based on Amazon reviews these issues don’t appear too common.

TapTes only offer a few colours – Clear, Black Matte, Glossy Carbon Fibre and Matte Carbon Fibre.
Coming in much cheaper, the TapTes Wraps are US$20 and free shipping, so AU$29.

5. Kenriko

OK, so I’d never heard of Kenriko before, but people on Reddit are recommending this wrap.
(I couldn’t find much about the company, other than recent reviews of Model 3 related products.)

The Centre Console wraps are available in Carbon Fibre, Matte Black, Matte White, and Brushed Metal.
At the time of writing, all their wraps are out of stock, on their own website and their Amazon listings.

The listed price is US$29.50, so AU$43. Shipping doesn’t appear to be free, but I cant find out what it is while it’s out of stock. So overall, the Kenriko looks to cost about the same as the EV Wraps, depending on shipping.

Conclusions

In the end, you have the option to spend anywhere from $29 to $160 on wrapping your console.

The first three vendors listed above all use the same 3M vinyl material and offer (mostly) the same colours, so there’s little reason to pay the premium unless you want a specific option (custom colour or embossing) not offered by the others. So I guess that means my recommendations would be for TapTes if you’re feeling lucky, or EVwraps if you’d prefer the 3M 1080 Vinyl.

CompanyCommentsTotal $AU
1. Abstract OceanCustom colours available for a small premium.$ 77
2. EV WrapsCheapest option with 3M Vinyl$ 63
3. RPM TeslaEmbossed options. Wood look available for $160$ 107
4. TapTesHalf the price of the next option, but limited colours.$ 29
5. KenrikoAbout the same price as EV Wraps. Out of stock.$ 43 +shipping

Note that you can probably save by buying a few items from the same Vendor. For example, if you were already planing to buy something from Abstract Ocean (eg. a Nomad Wireless charger), you could buy the wrap from Abstract Ocean without any extra shipping, which would make it cheaper than the EVwraps. Before I start ordering, I intend to work out all the options I want, then see how I can order to minimise unnecessary shipping – so stay tuned!

Wireless Phone Chargers – Tesla Model 3 Australia

Want to find a Wireless Phone charger for you Tesla Model 3 in Australia? Scroll down!

So you have an awesome new Tesla Model 3, and you want a wireless charger to make your new pride and joy feel like the 21st century mode of transportation that it is. There’s no shortage of chargers available – but you also live in Australia, so availability, shipping and all that is just a little bit different. Well, so do I, so here’s the low down on the chargers, how to get them here, and what it costs to do just that.

Jump to Conclusion

1. Nomad Wireless Charger for Tesla Model 3

The Nomad Wireless Charger seems to be a favourite overseas, thanks to its’ snug fit, high build quality, and decent charging speeds. It’s also one of only a few to feature charging lights, so you can tell if your phone is charging without touching the phone.

With both USB connections from the Nomad plugged-in, it will charge two Qi capable phones at up to 7.5W each. Note: It originally did this by having an integrated battery, to supply the shortfall between what the Model 3 could supply, and what the phones wanted to draw. The Model 3 now supplies more power, so this internal battery is no longer supplied (but it will not be required in Australian Model 3’s anyway).
Nomad Website: https://hellonomad.com/products/tesla-charger

Review of 4 wireless phone chargers for the Model 3: 4 Best Wireless Charging Pads for Tesla Model 3 You Can Buy

Review by Electrek: https://electrek.co/2018/10/24/review-nomad-wireless-charger-tesla-model-3-video/
The easiest way to get one is to buy directly from the manufacturer, Nomad. It’s not cheap though, at around AU$185 (US$129). And shipping is about what you would expect, at AU$25 (US$17.82).

So, fully landed in Australia, you’re looking at around AU$210, depending on the exchange rate.

(Note: If you wait for a sale, you can probably save a few bucks. Discount codes for 20%-off have been available in the last year, which would bring down the price by about AU$35.

2. Jeda Wireless Pad – Tesla Model 3 Wireless Phone Charger

The Jeda charger is another which seems to rate well in reviews. It’s very similar to the Nomad in terms of speed and build quality. There seem to be three four main differentiating factors:
1) Landscape orientation. If you want the phone laying in landscape for navigation, the Jeda lets you do this.
2) No LEDs on the Jeda, unlike the Nomad
3) Detachable Cables. Replaceable if they’re broken, and you can run them to the 12V socket if you want to charge at up to 15W.
EDIT 20/07/2019:
4) The Jeda also allows for wired charging. If you or someone in your car has a phone without Qi, you can route a USB cable with your preffered connector out the bottom and to the front. Doing so requires a $22 (US$15) spacer – but if you have access to a 3D printer you can print your own for about 40c of filament.
Jeda Website: https://getjeda.com/

Review of 4 wireless phone chargers for the Model 3: 4 Best Wireless Charging Pads for Tesla Model 3 You Can Buy

CleanTechnica Review: https://cleantechnica.com/2019/02/17/the-jeda-pad-adds-wireless-phone-charging-for-the-tesla-model-3-in-a-slick-package/
So, Australian Pricing and Availability…

Direct from the manufacturer it’s ~AU$140 (US$99) plus AU$35 (US$35) shipping. So a total of AU$177 all up.

3. RPM Tesla – Model 3 Dual Qi Wireless Charging Pad Gen. 3

So, next item in the list – the offering from RPMTesla. They’re a reputable manufacturer of Tesla accessories, so you should be able to expect the same of this offering.

Like the Nomad, it has a charging LED and can only support holding phones vertically. It also has a logo at the top, with various options (either the “three lines” hamburger logo, or the Tesla style “3”).
RPM Tesla website: https://www.rpmtesla.com/products/model-3-qi-wireless-fast-charging-pad-upgrade-49-w-20-off

RPMTesla do ship directly to Australia. It’s ~AU$140 (US$99) plus AU$30 (US$20) shipping. So a total of AU$170 to get one here.

Note that if you buy over $150 of gear from RPMTesla, you get 20% off – making it one of the cheaper chargers.

4. Evannex OWL – Dual Qi Wireless Phone Charger for Tesla Model 3

So Evannex, another manufacturer of EV accessories, have come out with a slightly different offering here – the OWL. They say the name is an acronym for (On-board Wireless Layer), but I feel that’s an afterthought – looking at the charger, those big charging loops make it look like an Owl!

As long as it has sufficient input, it can charge at 7.5W like the other units, so nothing exciting technically. Really, if you pick this charger, you’re picking it because you like the look.
Evannex website: https://evannex.com/products/qi-wireless-phone-charger-for-tesla-model-3
The OWL is AU$129 (US$89), so it’s on the cheaper end of the scale.

Unfortunately it is currently out of stock, so I can’t get a quote for shipping, but based on similar sized items at Evannex I would estimate AU$20. So an estimated total cost of about AU$150.

Note that there are discount codes floating around for Evannex, with $10 off codes fairly plentiful, and occasionally discounts as high as 30% off – so keep you eye’s peeled if you like the Owl!

5. Tesla OEM Wireless Phone Charger

A finally, we have the newest entrant – a Qi wireless charger from Tesla themselves. No tech specs are given, and it’s so new there are no reviews yet, but it claims to have a non-slip silicon surface, and can charge two devices at once.

Asthetically, it looks very much like the Nomad, without the charging LEDs.
US Tesla store link: https://shop.tesla.com/us/en/product/vehicle-accessories/model-3-wireless-phone-charger.html
This charger comes in at AU$179 (US$125), and Tesla don’t ship internationally from their store. Using a freight forwarder is likely to cost ~$40, so it would be the most expensive option at ~$220.

However it is likely Tesla will make it available locally once Model 3s start landing here, likely around the $200 mark (US price + GST).

6. TapTes Wireless Charging Pad

EDITED 20/07/2019

So TapTes is a new entry to the market. Operating out of Hong Kong, TapTes have released a massive number of Model 3 accessories since appearing a few months ago.
The TapTes charger for the Model 3 attempts to combine the best elements of all the other options on the market. The Charging LEDs of the Nomad, the Landscape option of the Jeda, the ability to still use a wired charger, and included splitter for the DashCam and Sentry mode.

On Paper, the TapTes seems to tick all the boxes of the favourites above. There were reports of quality issues with the first units, however a Version 2 has replaced the first version, and I haven’t noticed many complaints about this revised unit.
The TapTes wireless charger is US$49.99, and shipping is included. For a total of AU$72, this is definitely a contender.

Others

EDIT 20/07/2019: Just a word of warning about the plethora of ‘similar’ chargers being advertised on eBay/Amazon/Wish. Many of these are using images copied from the Nomad/Jeda websites, with the original logo photo-shopped out. When the product arrives it looks nothing like the photos, and the main complaint seems to be that they don’t fit and fall out of place just through regular driving. Based on the discussions on Facebook at TMC, there don’t seem to be too many positive experiences.

You might get lucky, but personally I would just buy the TapTes if the cost of the others is an issue, rather than play roulette with cheaply made knock-offs.

CONCLUSION

Of the five six options above, there’s no clear winner. Summary below:

ChargerCommentsTotal $AU
1. NomadThe Nomad seems to be the one that sets the standard.$210
2. JedaLike the Nomad, without LEDs, but with Landscape mode.$177
3. RPM TeslaLike the Nomad, with Blue LEDs and a logo at the top.$170
4. EVANNEXOWL eyes. Enough said.$150
5. Tesla OEMThe priciest option, but guaranteed by Tesla themselves.$220
6. TapTesNew player, with a compelling product$72

Personally, I think I’ll be opting for the Jeda. As a future SR+ owner, I’d still like the ability to lay my phone sideways for some Waze. But we still have a few months before they land down here, so I’ll keep my options open until a little closer to August!

EDITED 20/07/2019: The new charger from TapTes comes in $100 under the competition (after shipping) and offers the best features from all of them. I haven’t read through the reviews on Amazon yet, but if they’re positive I’ll be seriously considering the TapTes over the Jeda.

Did I miss something? Leave a comment below!